Skywalking是一个分布式系统的应用程序性能监视工具,专为微服务、云原生架构和基于容器(Docker、K8s、Mesos)架构而设计。SkyWalking 是观察性分析平台和应用性能管理系统。提供分布式追踪、服务网格遥测分析、度量聚合和可视化一体化解决方案。支持Java, .Net Core, PHP, NodeJS, Golang, LUA语言探针,支持Envoy + Istio构建的Service Mesh。
快速安装
本案例将skywalking中的数据存储在elasticesearch中,需要提前安装好elasticsearch7.x,可以参考这篇文章(https://www.fangzhipeng.com/springboot/2020/06/01/sb-es.html)安装,当然skywalking可以将数据存储在其他数据库中,比如mysql、infludb等。
去官网下载apache-skywalking的安装包,本案例是需要将监控数据存储在elasticesearch中,所以使用apache-skywalking-apm-es7-6.6.0.tar.gz这个jar包,并且需要安装elasticsearch7.x。执行下面的命令下载skywalking
wget https://www.apache.org/dyn/closer.cgi/skywalking/6.6.0/apache-skywalking-apm-es7-6.6.0.tar.gz
执行tar -zxvf apache-skywalking-apm-es7-6.6.0.tar.gz,解压apache-skywalking-apm-es7-6.6.0.tar.gz,解压后的目录如下:
agent bin config LICENSE licenses logs mesh-buffer NOTICE oap-libs README.txt trace-buffer webapp
主要目录结构如下:
- bin目录存放的是启动脚本,包含oapService.sh、webappService.sh等启动脚本
- config是oap服务的配置,包含一个application.yml的配置我呢
- agent是skywalking的agent,一般用来采集业务系统的日志
- webapp目录是skywalking前端的UI界面服务的配置
整体的架构如下:

在整个skywalking的系统中,有四个角色:
- skywalking agent和业务系统绑定在一起,负责收集各种监控数据
- Skywalking oapservice是负责处理监控数据的,比如接受skywalking agent的监控数据,并存储在数据库中(本案例使用elasticsearch);接受skywalking webapp的前端请求,从数据库查询数据,并返回数据给前端。Skywalking oapservice通常以集群的形式存在。
- skywalking webapp,前端界面,用于展示数据。
- 用于存储监控数据的数据库,比如mysql、elasticsearch等。
启动Skywalking oapservice
修改oapservice的配置文件,在config目录下的application.yml文件中。
cluster:
  standalone:
storage:
 elasticsearch7:
    nameSpace: ${SW_NAMESPACE:"my-application"}
    clusterNodes: ${SW_STORAGE_ES_CLUSTER_NODES:localhost:9200}
    protocol: ${SW_STORAGE_ES_HTTP_PROTOCOL:"http"}
    trustStorePath: ${SW_SW_STORAGE_ES_SSL_JKS_PATH:"../es_keystore.jks"}
    trustStorePass: ${SW_SW_STORAGE_ES_SSL_JKS_PASS:""}
    user: ${SW_ES_USER:""}
    password: ${SW_ES_PASSWORD:""}
    indexShardsNumber: ${SW_STORAGE_ES_INDEX_SHARDS_NUMBER:2}
    indexReplicasNumber: ${SW_STORAGE_ES_INDEX_REPLICAS_NUMBER:0}
    recordDataTTL: ${SW_STORAGE_ES_RECORD_DATA_TTL:7}
    otherMetricsDataTTL: ${SW_STORAGE_ES_OTHER_METRIC_DATA_TTL:45}
    monthMetricsDataTTL: ${SW_STORAGE_ES_MONTH_METRIC_DATA_TTL:18}
    bulkActions: ${SW_STORAGE_ES_BULK_ACTIONS:1000}
    flushInterval: ${SW_STORAGE_ES_FLUSH_INTERVAL:10}
    concurrentRequests: ${SW_STORAGE_ES_CONCURRENT_REQUESTS:2}
    resultWindowMaxSize: ${SW_STORAGE_ES_QUERY_MAX_WINDOW_SIZE:10000}
    metadataQueryMaxSize: ${SW_STORAGE_ES_QUERY_MAX_SIZE:5000}
- cluster.standalone集群以单体的形式存在
- storage.elasticsearch7,存储使用elasticsearch7.x版本。
- storage.elasticsearch7.clusterNodes填elasticsearch的
在bin目录下执行 oapService的启动脚本
sh oapService.sh
oapService服务暴露了2个端口,分别为收集监控数据的端口11800和接受前端请求的端口12800。
启动skywalking webapp
skywalking webapp是用于展示数据的前端界面,在webapp目录下修改webapp.yml,
server:
  port: 8080
collector:
  path: /graphql
  ribbon:
    ReadTimeout: 10000
    # Point to all backend's restHost:restPort, split by ,
    listOfServers: 127.0.0.1:12800
- server.port是webapp的启动端口
- collector.ribbon.listOfServers 填写Skywalking oapservice的端口。
在bin目录下执行webappService的启动命令:
sh webappService.sh
spring boot项目集成
将agent目录拷贝到部署spring boot项目的机器里,修改agent的配置,配置在agent/config/agent.config:
agent.service_name=${SW_AGENT_NAME:my-skywalking}
collector.backend_service=${SW_AGENT_COLLECTOR_BACKEND_SERVICES:127.0.0.1:11800}

# Logging file_name
logging.file_name=${SW_LOGGING_FILE_NAME:skywalking-api.log}

# Logging level
logging.level=${SW_LOGGING_LEVEL:DEBUG}
- agent.service_name填和springboot的application.name即可,也可以随意取名字,但是不要和其他应用重名。
- collector.backend_service填写oapService的地址,端口填11800。
以javaagent的形式启动springboot工程:
java -javaagent:/root/skywalking/apache-skywalking-apm-bin-es7/agent/skywalking-agent.jar -jar boot-es-0.0.1-SNAPSHOT.jar
- -javaagent:/root/skywalking/apache-skywalking-apm-bin-es7/agent/skywalking-agent.jar,指定javaagent的目录,即skywalking-agent.jar在机器上的绝对路径。
- boot-es-0.0.1-SNAPSHOT.jar的源码下载地址为https://github.com/forezp/distributed-lab/tree/master/boot-es
简单测试
在boot-es-0.0.1-SNAPSHOT.jar启动的机器上调用以下接口:
curl localhost:8500/testInsert
curl localhost:8500/testGetAll
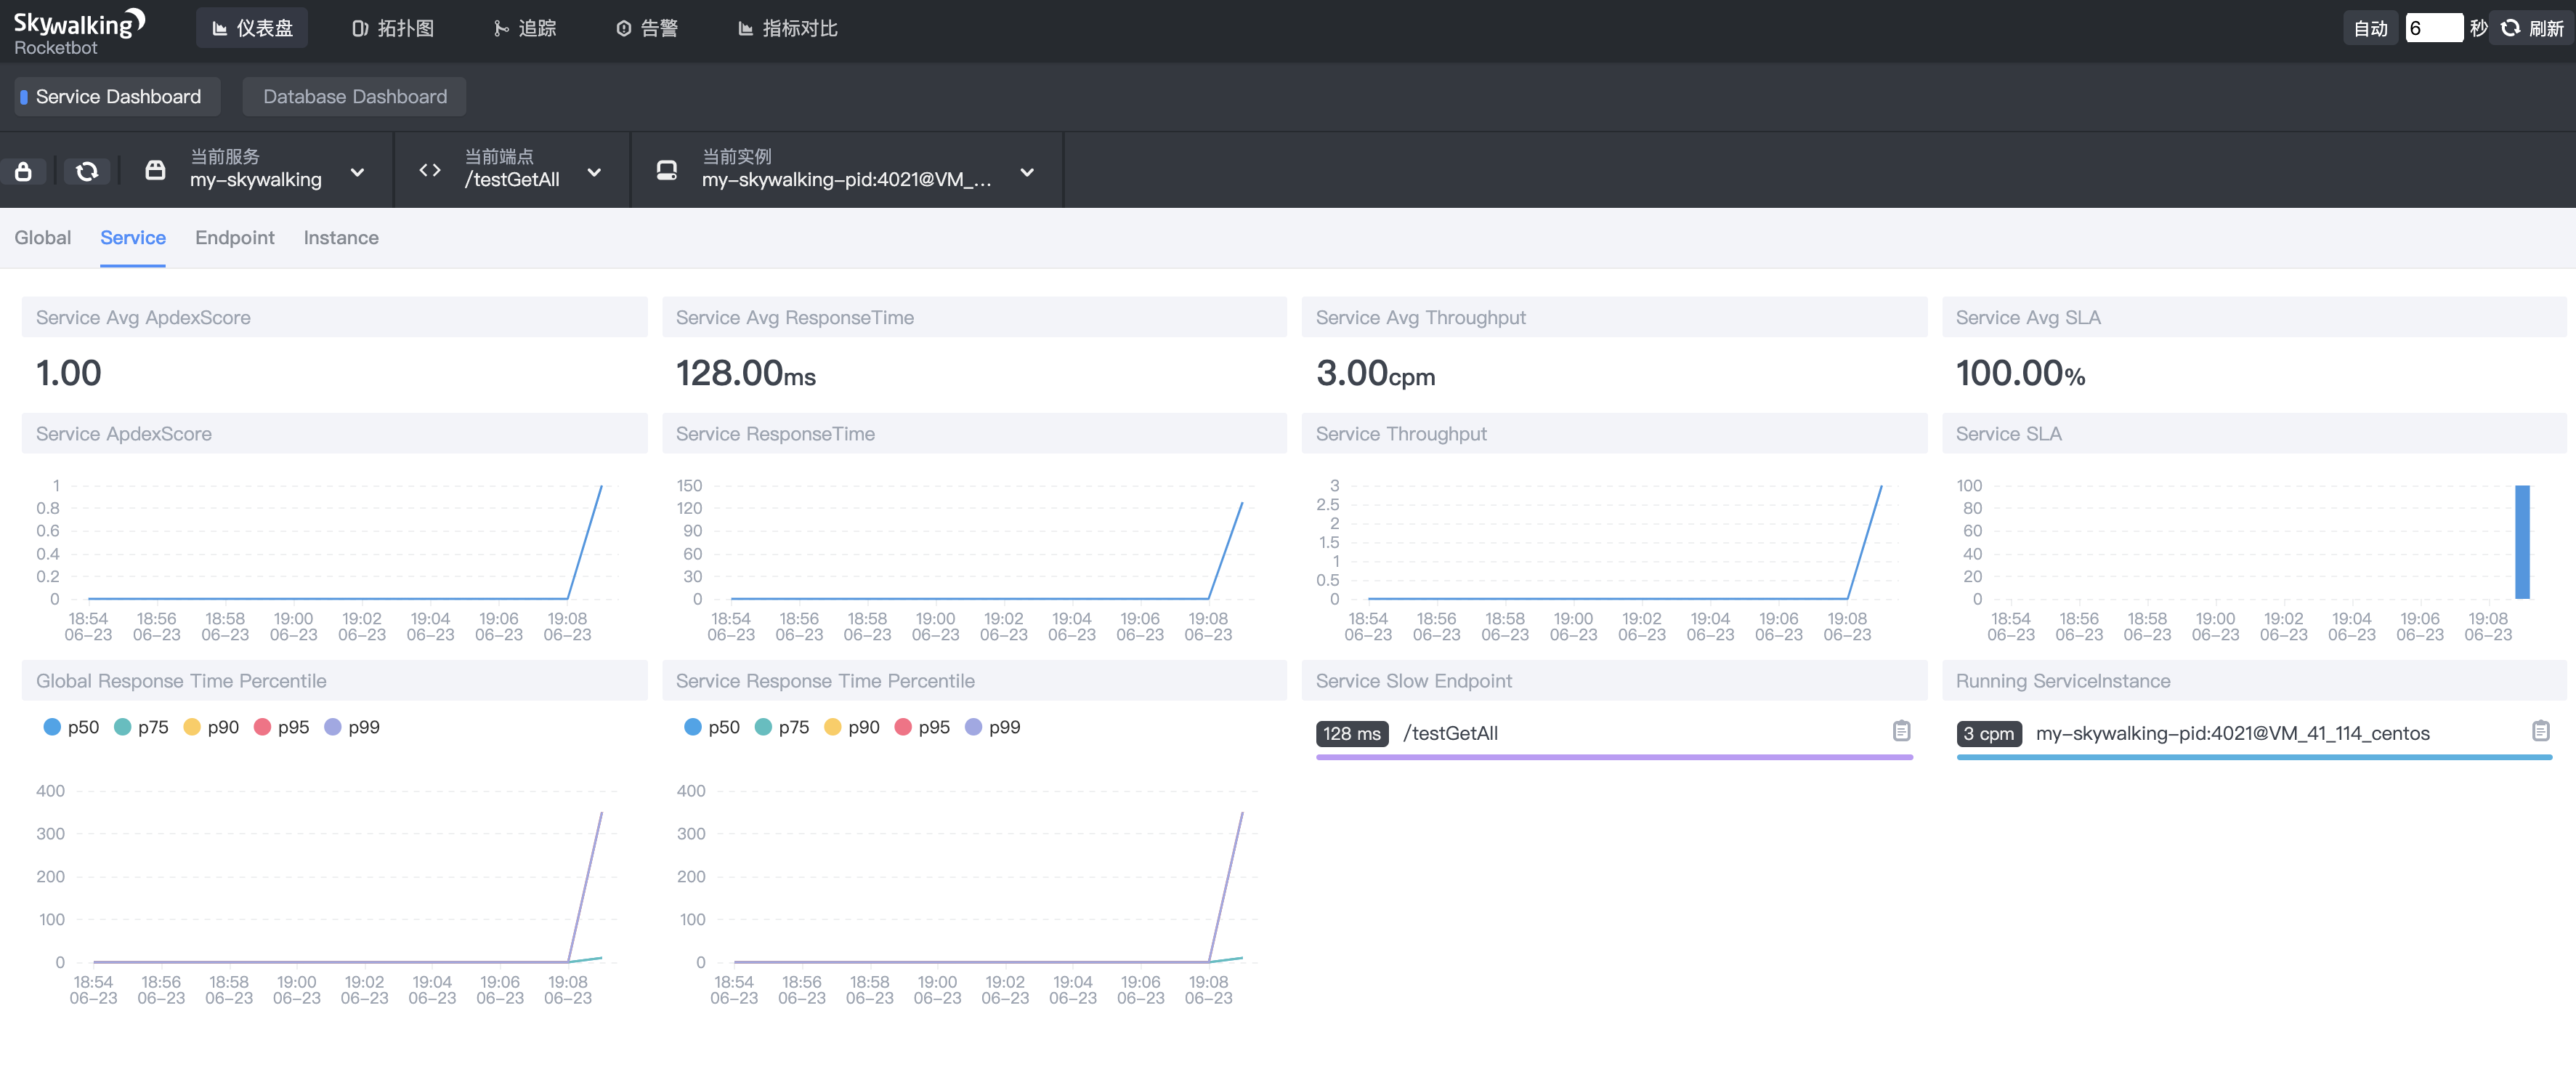
在浏览上访问skywalking webapp的地址,比如本文中skywalking webapp安装在本地,即访问localhost:8080,首页展示如下(如果数据展示不出来,尝试清空缓存重试,前端貌似不是很给力),展示了接口请求的一些数据:
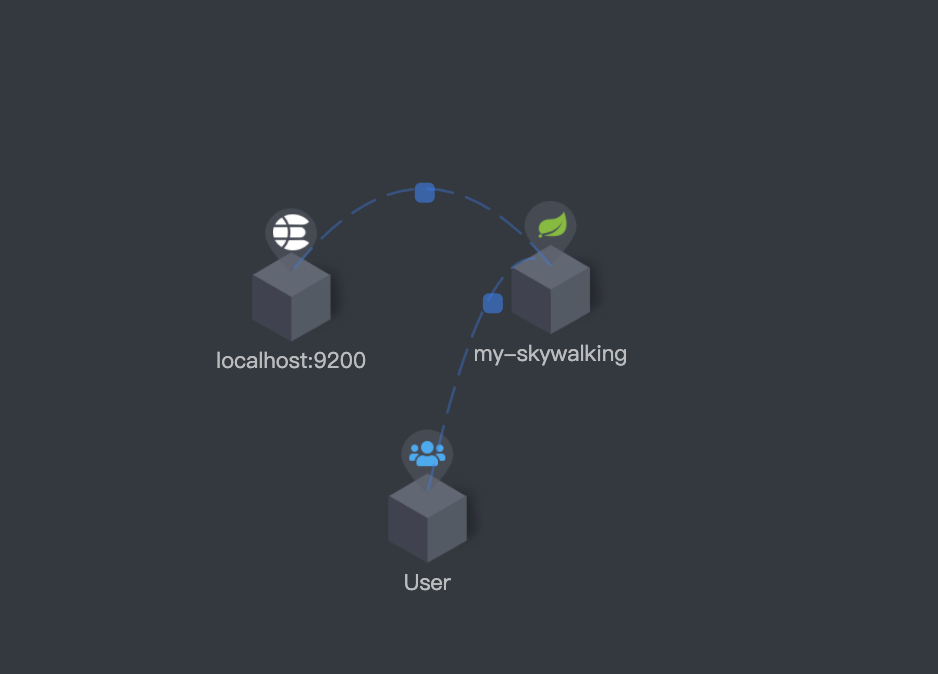
拓扑图如下:
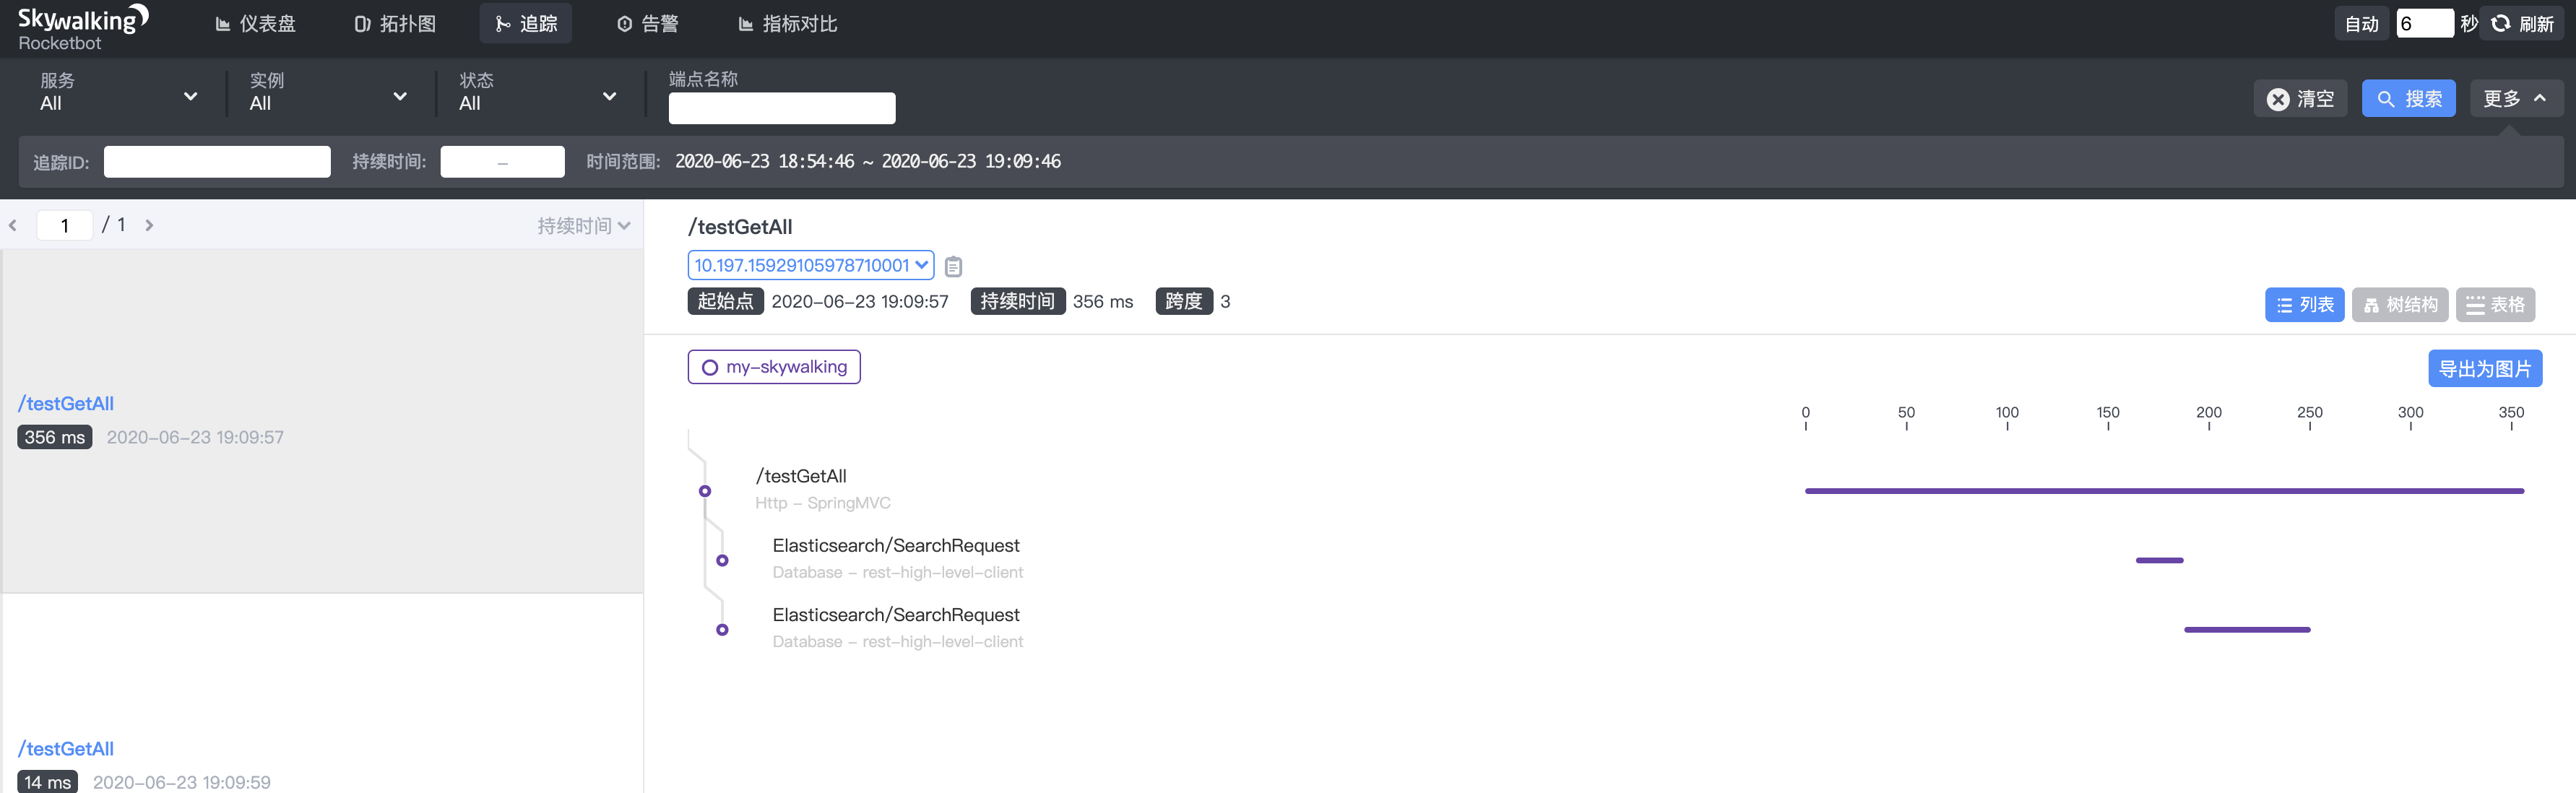
接口数据调用详情如下:
源码下载
https://github.com/forezp/distributed-lab/tree/master/boot-es
本文为原创文章,转载请标明出处。
本文链接:http://blog.fangzhipeng.com/architecture/2020/06/12/skywalking-test.html
本文出自方志朋的博客
![]()
(转载本站文章请注明作者和出处 方志朋-forezp)